Introduction
There may be times when you have a complicated query that you use in your Microsoft Sentinel workbook that you want to re-use and only filter to show one specific row. Rather than re-running the query, I will show you how to use the “merge” data source in a query step to re-use the table.
This should work in any Azure workbook, but I have only tested it against Microsoft Sentinel workbooks, hence the title 🙂
Using the Merge data source
Most likely you know how to create a new query step in a workbook. By default, when you add a new query step, the “Data source” field will be set to logs as shown below.

If you click on that drop-down, one of the options is “Merge”. This will allow you to merge two tables together much like using a “join” command in KQL. Actually, if you look at the merge types, most of the entries are listed as joins. More on that later.
To use the “Merge” data source, you will need to have two tables that can be merged. The only exception to this is if you duplicate an existing table in which case, you just select one table to duplicate.
Create the first table
For this example, I am just going to use a very simple query that returns the latest row for each incident in an incident table:
SecurityIncident
| summarize arg_max(TimeGenerated, *) by IncidentNumber
Again, this is a very basic table, but you can imagine joining to other tables to get all the information you want.
In the step that uses the table, you will need to export a parameter to use in the second table. In this example, I will have the “IncidentNumber” exported as “IncidentID” when a row is selected.
I also changed the “Step name” field to “FirstTable” to make it easier to figure out which table I want to use with merge.
Creating the second table
This is where the trick comes into play. Rather than using a real table, I create a fake table using the “datatable” command. It will only be populated by the parameter exposed from the first table as shown below:
let newTable = datatable (IncidentNumber: string) [{IncidentID}];
newTable
This table only has the one column and one row. This will be used to perform the match for the join command we will use with the “merge” data type.
Most likely, this step will be hidden as there is no reason to show just that single entry, unless you are debugging. You will also want to change this step’s name to make it easier to tell which table to select.
Combining the tables
Once you add the query step and change the data source to “merge” you need to configure it. Click the “Add Merge” button as shown in the image below:
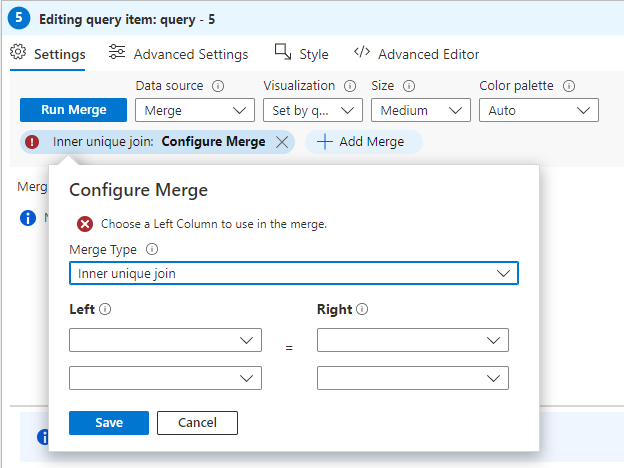
The first thing you will need to do is to select the type of merge you want to perform. Click on the “Merge Type” dropdown to get a listing of available merge types as shown below:
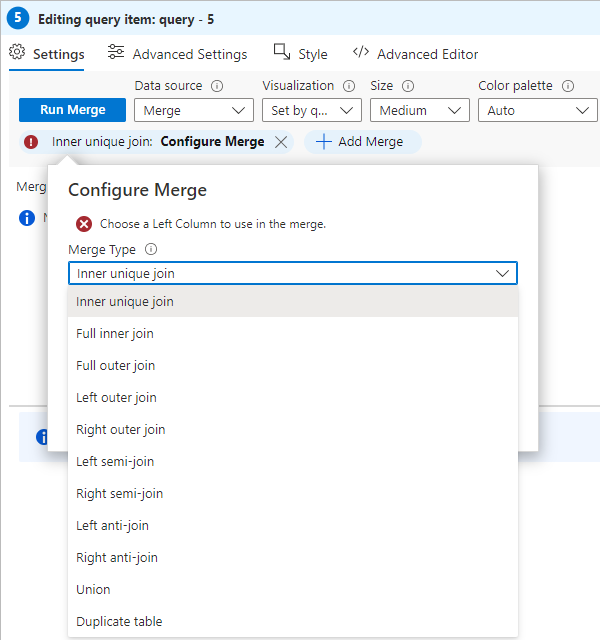
I am not going to go over all the different merge types. If you need a reminder, and I know I usually do, look at the “join” command in the KQL documentation page: join operator – Azure Data Explorer | Microsoft Docs
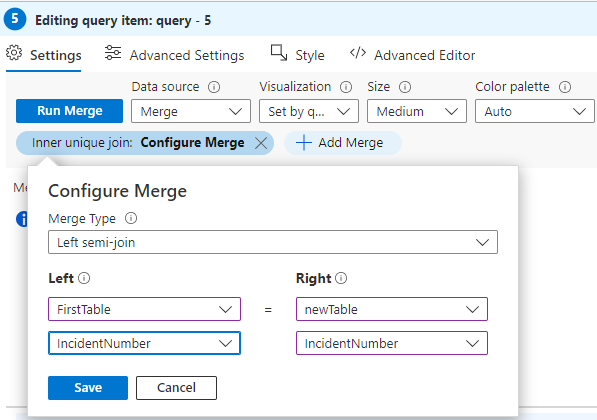
For this example, I selected “Left semi-join” since I only care about the data from the left side table (which will be “FirstTable”).
Next, select the left side table and the corresponding field. Select “FirstTable” and “IncidentNumber”. For the right-side table select “newTable” and “IncidentNumber”. When complete, it should look like the image below:
When you select a row from “FirstTable” this step will show only that one selected row without needing to do a round-trip to get more data. You can now select which columns to show and apply the formatting you need like you can with “regular” tables.
Summary
By using Merge with a data table, you can filter an existing table to show just the information you want to see without needing to do a round trip back to the server. Chances are, you will use this technique rarely, if ever. However, if you ever need it, you will see it can speed up your workbooks greatly.